Showing posts with label DIY. Show all posts

Thursday, October 1, 2020

A Long Overdue Porch Project

When I first designed our house and had it built, there wasn't much available in The States in terms of decorative features--at least not in an appropriate Tudor or Old English style. When the style flourished during the early part of the 20th Century, you could find all kinds of plaster and wood architectural detailing available in catalogs, but by 1992 all that was commonly available were variations of Victorian gingerbread or classically-inspired pieces. Cost and time were also factors; our budget was modest for both and all I could manage to make myself during construction were the large corbel brackets that reside under the jettied story above the entrance.

While I'd expect the search for such items to be easier in the UK, it hasn't changed much in the U.S.--unless you want something custom-made or a very expensive antique.

Finally, last year I was able to do exactly that; custom-make a proper Tudor arch for the entry of our house, replacing the gingerbread scrolls that adorned the entry alcove for two-and-a-half decades. Since this had a southern exposure, and with maintenance in mind, I used 1-inch thick Azek board, backed with another inch of white pine, sandwiched together to provide the appropriate width for the small corbels on each side. As you may know, Azek is a PVC material that will last practically forever, never rot, and carves very much like wood. Also, since the trim is to be painted white anyway, it was an easy choice.

Wednesday, April 24, 2019

A New Fireplace for The Basement

First of all, allow me to apologize for the long time between posts; it has been a busy year with no shortage of distractions both at home and at work. For now, let me begin anew by recapping some of the progress I have been making down in our basement.

As you may recall, I have already enclosed the area under the stairs for a wine/beer cellar, almost finished a bar-height counter/island, built in some storage closets and enclosed my electrical panel. Across one side of the main room I have constructed a fireplace with two cabinets on either side, which are used not only for storage, but to hide two very large, vintage Pioneer speakers that are part of the music system.

The fireplace. The mantel is extra deep, as the wife likes to decorate it  during the holidays. While the paneling above is nice, it will be covered by a larger, mounted TV in due time.

I had some of the paneled bi-fold doors left over from my island project, and used some of these in the structure above the fireplace mantel; I used two more on the side, which are hinged to open for some extra storage space. The fireplace structure is all framed with 2" x 4" lumber and plywood, as are the cabinets built on either side. For the doors, I simply framed them with 1" x 4" pine and covered the open spaces with an off-white burlap, which allows the sound from the speakers to go right through.

One issue that had to be addressed was access to my water meter and main shut-off, which is located at the bottom of the wall directly behind the fireplace. Our city uses an electronic remote-read device, so we don't have a reader coming into the house anymore, but if they ever replace the system, or I need to shut off the water supply to the house from the inside, I still need to get back there. Since the fireplace is electric (a rustic-looking Duraflame unit that heats and looks rather convincing, if I do say) this was not an insurmountable problem.

The firebox and its decorative frame are separate from the rest of the fireplace surround and can be rolled out to access the water meter and shutoff valve.

What I did was build the firebox as a separate unit that rolls in-and-out on hidden casters, fit into the fireplace opening with a decorative frame attached to it. When in place, it looks permanently attached, though it only take a second to pull the whole thing out and access the meter behind. I covered the inside of the firebox with some leftover floor tile I had from another project, and finished up the fireplace surround with some corbels and a length of decorative exterior molding I had on hand. All in all, my carpentry skills are just passable, but I am happy with the result; it is certainly up to snuff for a basement entertainment space.

One happy footnote to the project was the effect it had on my sound system. My two large speakers date from the mid-1970s; they are 6-way designs, with huge 15" woofers. They weigh a ton, and while they are very, very efficient, they sacrifice some true bottom end as a trade-off in this respect. However, I found that inserting them into an even larger cabinet significantly extended the bass response, to where the sound is more reminiscent of the old Altec-Lansing Voice-of-the-Theater speakers that are so legendary. Combined with the smaller rear speakers I use in the back of the room, the result works for everything from sporting events on the TV to a symphony...or a disco dance party.


Friday, November 3, 2017

OUT FRONT: Fences and Flower Beds

Nothing like a fresh coat of white paint.
As I noted in my previous post, I regret not getting more done this summer around the house. What did get done focused mostly on the backyard and pool area; while my efforts to get the front lawn back in order bore some fruit, it was not until September that I was really able to get to work on the front of the house.

As I noted in previous posts, I have been working to restore the fence that flanks both sides of the house. I was finally able to complete the restoration of the large post at the west side, and then continued sanding and repainting all the fence pickets in-between. As of this writing, I have completed three of the eight 8-foot sections of fencing. With the sides facing the front of the house, I applied a very high-quality latex, working it in with a brush; I may use my new paint sprayer for the rest, to save time.

Just need to define this flower bed a little more...
I think I have re-painted this fence maybe twice in 25 years; this was by far the most complete wire-brush-and-sanding job that I have ever done, so hopefully it will last for a while. The treated cross beams are fine; a few of the cedar pickets (especially where they have been in contact with the ground) have seen some rot. This will be hidden by a treated 1” x 4” that I am adding at the bottom, which will not only look better buy hold back some of the soil and mulch I am adding in front.

Monday, September 4, 2017

Another Summer Come and Gone...

Sadly, this summer ended up being far less productive than I had hoped. Reviewing my “to-do” list of items that needed addressing, it seems I have only been able to complete a few of them. Now there is only the hope that the coming Fall may serve to be a more productive season as far as the house is concerned.

No, this is not the reason for my lack of productivity. A nice addition to my tiki bar, thanks to the good people at Windsor & Eton Brewery.
A large part of this was due to our trip to the UK in mid-May; between holiday planning and the weather upon our return, this set me back about 3-4 weeks in terms of my usual summer work schedule. In recent years, we’ve been able to open the pool during the first week of May, with another week or two after that to handle annual chores like cleaning the patios, doing touch-up painting on the decks and some outdoor furniture—which all has to be hauled out of storage—tidying up the perennial beds, setting up our tiki bar on the back deck and bringing all the seasonal decorative items out of the garage, shed and basement. This is then followed by planting of tropical-looking annuals in beds and in pots all around the pool.

Friday, March 3, 2017

Basement Renovation: Part 2: A Modest Wine Cellar

Let me first come clean and explain that I am not really a wine enthusiast. I do drink and enjoy it at times; usually at a meal, when paired with the right food. When my wife and I travelled to Napa a couple of years ago, I loved the wineries. I loved sampling the wines—especially when they served them with some really tasty chocolates.

Nevertheless, when it comes right down to it, I am a Beer Guy. Not the vapid swill that passed for beer during most of the last 50 years, but better quality craft beer and exports.

Finding this door for $50 was one of the best
things about this project.
My wife likes wine, but generally she prefers very sweet wines—Muscato, Prosecco, ice wines or an occasional Reisling. For the most part, these are not the kind of wines that hang around very long—or that improve significantly with aging.

So, why a wine cellar, you may ask?

Well, for one thing, we have friends who like to drink wine, maybe before, during or after dinner. So it’s always a good idea to have some on hand.

In addition, I planned to store some craft beers in the cellar as well—in particular, those high-gravity stouts, porters, ales and barley wines that do age and mellow well.

Monday, February 13, 2017

Not a Change in Direction. An Expansion of Subject.

When I first created this website, I wanted to have someplace where I could talk about the kinds of houses and buildings I loved, remember the people who designed and built them, recognize people who maintain, live in and restore them, and survey related topics in design, the arts, lifestyle and popular culture—including books.

Having utilized much of this accumulated information in the design of my own home—I have chosen from time to time to write about some of the projects I’ve worked on since building our house almost 25 years ago.  Some of the posts have involved thoughts on decoration, some are how-to’s (or maybe how-I’s) - that discuss things I’ve had to fix; other posts have simply touched on my own thoughts about building and design.

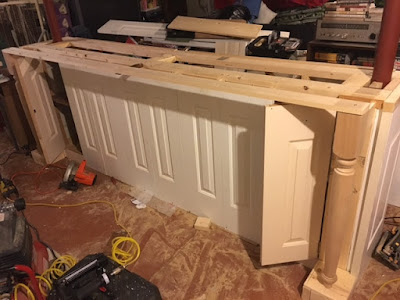
This is a bar-height island I am building in the basement using 2" x 4" framing and some used bi-fold doors. More on this project later...
As I’ve mentioned before, while I had very specific ideas about the design of my own house, budgetary issues (I was 34 when we built, and modestly employed) forced a number of compromises, some of which I have been able to remedy over the years. Many still remain, and I will increasingly use the website to discuss how they are being addressed, for after all—when is a house ever truly finished? When we built, I knew I would have to plan for the long term, assuming that some materials, designs and finishes would make an appearance at a later date. Sometimes much later, as it turns out.

I am a notorious procrastinator, so the fault is mostly mine. After some deliberation, I find myself in a good position now to make it down the home stretch and finally get things as I originally envisioned them years ago, when I set plans to sheets of vellum (yes, no 3D renders for me) and started searching for a general contractor.

So, interspersed among the posts on historical houses, old architecture books, preservation/heritage issues and related commentary—you can expect to see more “hands-on” bits and pieces about things I am doing inside the house.

I’d be remiss if I didn’t admit that I have clearly noticed the popularity of so many design and “how-to” blogs; so I feel it is a natural course to develop this approach as I go along. It’s a chance to further explain—in practical terms—how I try to integrate whatever knowledge I have accumulated and my own design sensibilities into the projects I take on inside these four walls.

If, Dear Reader, you care to comment, share your thoughts or experiences, or ask questions, I will sincerely appreciate it, and would love to hear from you.